
Webpackにはプラグイン機能があり、webpackの機能を拡張する事が出来ます。
今回はプラグインを使用します。
なお、前回までの内容の続きになります。
HTMLファイル
バンドルファイル(main.js)を読み込む為のindex.htmlを作成します。index.htmlファイルは src ディレクトリ直下へ作成します。
.
├── node_modules
├── package-lock.json
├── package.json
├── src
│   ├── js
│   │   ├── index.js
│   │   └── test.mjs
│   └── index.html
└── webpack.config.js
index.html の内容は以下の通りです。
<!doctype html>
<html lang="ja">
  <head>
    <meta charset="utf-8">
    <meta name="viewport" content="width=device-width, initial-scale=1">
    <title>sample</title>
  </head>
  <body>
    <div>
      <h1>Hello, Webpack!</h1>
    </div>
  </body>
</html>
プラグインのインストール
以下のコマンドを実行しhtml-webpack-plugin をインストールします。
npm i --save-dev html-webpack-pluginwebpackの設定
webpack.config.js を修正します。
'use strict'

const path = require('path')
const HtmlWebpackPlugin = require('html-webpack-plugin')

module.exports = {
  mode: 'development',
  entry: './src/js/index.js',
  output: {
    filename: 'main.js',
    path: path.resolve(__dirname, 'dist')
  },
  plugins: [
    new HtmlWebpackPlugin({ template: './src/index.html' })
  ]
}
修正したのは以下2箇所になります。
const HtmlWebpackPlugin = require('html-webpack-plugin')以下の例は、srcディレクトリ以下のindex.htmlファイルを読み込むという設定になります。
  plugins: [
    new HtmlWebpackPlugin({ template: './src/index.html' })
  ]
webpackの実行
webpackを実行します。
npx webpackdistディレクトリ以下にmain.jsとindex.htmlが出力されます。
ブラウザからdistディレクトリ以下にあるindex.htmlを開きます。
コンソールにjavascriptの実行結果が表示されます。
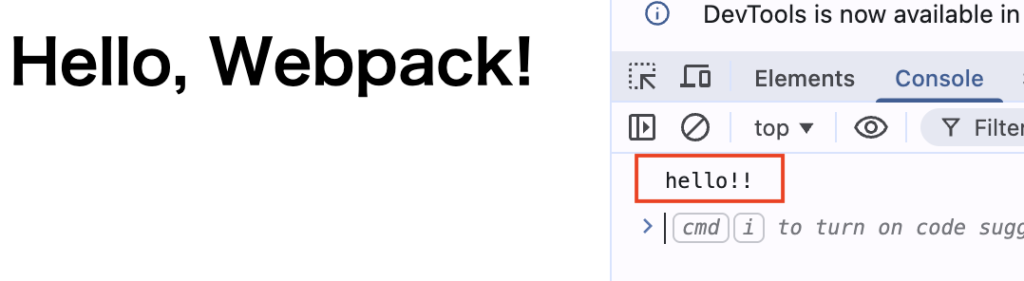
なお、distディレクトリ以下のindex.htmlを見ると、バンドルファイル(main.js)が読み込まれている事が分かります。
<!doctype html>
<html lang="ja">
  <head>
    <meta charset="utf-8">
    <meta name="viewport" content="width=device-width, initial-scale=1">
    <title>sample</title>
  <script defer src="main.js"></script></head>
  <body>
    <div>
      <h1>Hello, Webpack!</h1>
    </div>
  </body>
</html>
次回
web画面作成にはスタイル(css)を使用する事がほとんどです。
次回はwebpackでcssを使用出来るようにします。